What’s Inside an E-Bike Battery? Advanced Testing, Repair & Custom Tools
The e-bike battery is the "heart" of your electric bicycle, dictating range, power, and safety. As e-mobility gains popularity globally, understanding the internal structure of e-bike batteries has become essential for riders, repair technicians, and enthusiasts alike. In this comprehensive guide, we’ll dissect the core components of an e-bike battery—from lithium-ion cells to BMS systems—explain their roles, distinguish between high-quality and low-quality options, break down price differences, and explore advanced testing methods, repair techniques, and custom tools that keep your battery performing at its best.
Core Components of an E-Bike Battery: Roles & Responsibilities
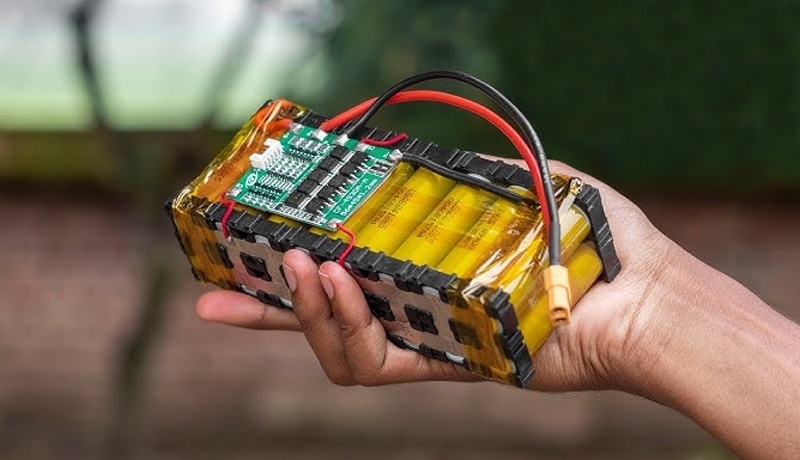
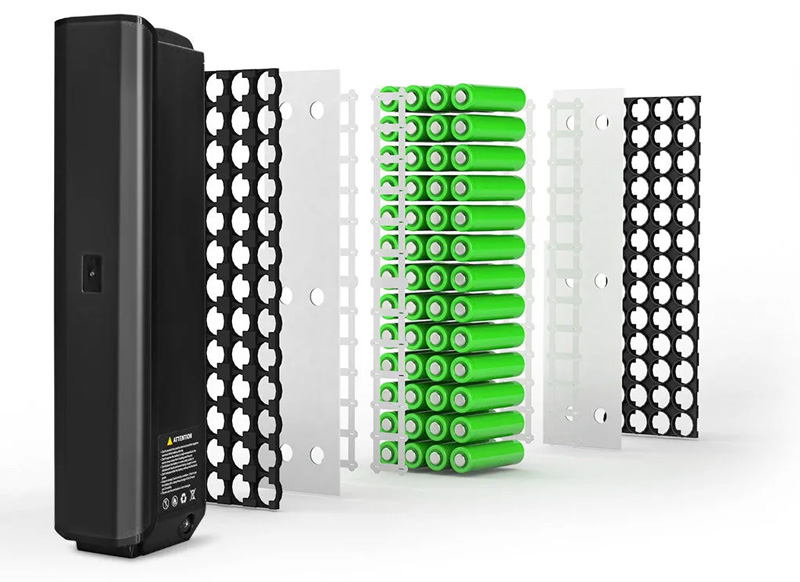
A typical e-bike battery pack is a sophisticated assembly of interdependent components, each designed to ensure efficient energy storage, safe power delivery, and long-term durability. Below is a detailed breakdown of each key part.
1. Lithium-Ion Cells: The Energy Storage Core
Lithium-ion cells are the fundamental building blocks of e-bike batteries, responsible for storing and releasing electrical energy. They are the primary determinant of the battery’s capacity (Ah), voltage (V), and overall performance.
Types & Roles
Common e-bike cell types include cylindrical (18650, 21700) and prismatic cells, with chemistries like Lithium Iron Phosphate (LiFePO4) and Nickel Cobalt Manganese (NCM) dominating the market. LiFePO4 cells are favored for their exceptional safety (low risk of thermal runaway) and long cycle life, while NCM cells offer higher energy density, enabling longer range in a smaller form factor.
High-Quality vs. Low-Quality
High-quality lithium-ion cells undergo rigorous testing (e.g., capacity consistency, cycle life, thermal stability) to meet international standards (such as IEC 62133). They feature precise electrode coating, uniform electrolyte distribution, and robust casing, ensuring stable performance over 1000 charge-discharge cycles. In contrast, low-quality cells (often counterfeit or recycled) have inconsistent capacity, poor thermal resistance, and a cycle life of less than 300 cycles—posing fire and explosion risks.
Price Differences
High-quality cylindrical cells (e.g., Panasonic 21700, Samsung 18650) cost $2–$4 per cell, while premium LiFePO4 prismatic cells range from $5–$8 per cell. Low-quality generic cells are significantly cheaper, at $0.5–$1.5 per cell, but the total cost of ownership is higher due to frequent replacements and potential safety hazards.
2. Nickel Strips: The Conductive Connectors
Nickel strips are thin, flat pieces of nickel alloy that connect individual lithium-ion cells in series or parallel to form the battery pack. Their primary role is to facilitate efficient current flow between cells, ensuring uniform charging and discharging.
Types & Roles
The two main types are pure nickel strips (99.6% purity) and nickel-plated steel strips. Pure nickel strips offer excellent conductivity (resistivity ~6.9 μΩ·cm) and ductility, making them ideal for high-current e-bike batteries. Nickel-plated steel strips are cheaper but have lower conductivity (resistivity ~15 μΩ·cm) and are more brittle.
High-Quality vs. Low-Quality
High-quality nickel strips have a consistent thickness (0.1–0.2 mm for e-bikes), uniform plating (if applicable), and no surface defects (e.g., scratches, oxidation). They can handle continuous currents of 20–30A without overheating. Low-quality strips are thinner (≤0.08 mm), have uneven plating, or use impure nickel alloys—leading to high resistance, overheating, and even melting during high-load operation (e.g., climbing hills).
Price Differences
Pure nickel strips cost $0.3–$0.5 per meter (for 10mm width), while nickel-plated steel strips are $0.1–$0.2 per meter. Investing in high-quality pure nickel strips is critical for battery safety, as low-quality strips are a common cause of battery pack failures.
3. BMS (Battery Management System): The Safety Guardian
The BMS is an electronic circuit board that monitors and protects the battery pack. It is the "brain" of the e-bike battery, responsible for balancing cell voltages, preventing overcharging, over-discharging, overcurrent, and short circuits.
Roles & Key Functions
- Cell Balancing: Ensures all cells charge to the same voltage, preventing overcharging of individual cells and extending battery life.
- Overcharge Protection: Cuts off the charging current when the battery voltage exceeds the safe limit (e.g., 4.2V per Li-ion cell).
- Over-Discharge Protection: Stops discharging when the voltage drops below the minimum safe level (e.g., 2.5V per Li-ion cell) to avoid cell damage.
- Overcurrent Protection: Shuts down the battery if the discharge current exceeds the rated limit (e.g., 20–40A for e-bikes).
- Short Circuit Protection: Instantly cuts off power in case of a short circuit (e.g., damaged wiring).
High-Quality vs. Low-Quality
High-quality BMS systems use premium components (e.g., Texas Instruments, STMicroelectronics chips) and feature precise voltage detection (error ≤±0.01V) and fast response times (≤10ms) to faults. They also include thermal protection (via NTC thermistors) and have a compact, robust design that fits seamlessly into the battery pack. Low-quality BMS systems use cheap, low-precision chips, have slow response times, and lack key protections (e.g., thermal monitoring). They may fail to detect overcharging or overcurrent, leading to battery damage or safety incidents.
Size & Current Capacity
The size of the BMS (specifically the number and rating of MOSFETs) determines the maximum charge and discharge current. A high-quality BMS for a 250W e-bike can handle 20–30A, while a BMS for a 500W+ high-performance e-bike may support 40–60A. Smaller, low-quality BMS systems often have a maximum current of ≤15A, which limits the e-bike’s power and can cause the BMS to overheat.
Price Differences
High-quality BMS systems for e-bikes cost $15–$40, depending on current rating and features. Low-quality BMS systems are available for $5–$12 but are unreliable and risky for regular use.
4. Waterproofing Components: The Environmental Shield
E-bike batteries are exposed to rain, dust, and moisture during use, so waterproofing components are essential to protect internal electronics. The main waterproofing elements include the battery case, rubber gaskets, and sealed connectors.
Types & Roles
Battery cases are typically made of ABS plastic or aluminum alloy with a waterproof rating (IP rating) of IP54 or higher. Rubber gaskets seal the case lid to prevent water ingress, while sealed connectors (e.g., XT60, Anderson) protect the charging and discharge ports.
High-Quality vs. Low-Quality
High-quality waterproofing components have an IP65+ rating, meaning they are dust-tight and can withstand low-pressure water jets (e.g., heavy rain). The case is thick (≥2mm) and has reinforced seams, while gaskets are made of durable EPDM rubber that resists aging. Low-quality waterproofing uses thin plastic cases (≤1mm), cheap foam gaskets (prone to cracking), and non-sealed connectors—allowing water and dust to enter, which causes short circuits and corrosion.
Price Differences
High-quality waterproof battery cases with IP65 rating cost $20–$50, while low-quality cases are $5–$15. The cost of waterproof connectors and gaskets adds $3–$10 for high-quality options, compared to $1–$3 for low-quality ones.
Advanced E-Bike Battery Testing Methods
Testing is critical to assess battery performance, identify defects, and ensure safety. Below are the most effective advanced testing methods used by professionals:
1. Capacity Testing
Using a battery cycler (e.g., Neware, Maccor), technicians discharge the battery at a constant current (0.5C–1C) until it reaches the cut-off voltage. The total capacity (Ah) is measured to verify if it matches the manufacturer’s specifications. High-quality batteries retain ≥80% of their rated capacity after 500 cycles, while low-quality ones drop below 60% in the same period.
2. Cell Balancing Testing
A cell voltage tester (e.g., SkyRC CellMeter) measures the voltage of each individual cell during charging and discharging. A well-balanced battery has a voltage difference of ≤0.02V between cells. If the difference exceeds 0.05V, the BMS or cells need replacement.
3. Thermal Testing
Thermal imaging cameras (e.g., FLIR) detect hotspots in the battery pack during high-load operation. Hotspots (temperature >60°C) indicate faulty cells, poor nickel strip connections, or a defective BMS.
4. Short Circuit & Overcurrent Testing
Using a dedicated test bench, technicians simulate short circuits and overcurrent conditions to verify if the BMS triggers protection within the safe response time. High-quality BMS systems react in ≤10ms, while low-quality ones may take ≥50ms or fail entirely.
E-Bike Battery Repair: Key Techniques & Tools
Common e-bike battery issues include weak cells, faulty BMS, damaged nickel strips, and water damage. Below are essential repair techniques and custom tools:
1. Cell Replacement
Tools needed: Soldering iron (60W), nickel strip cutter, cell tester. Technique: Identify weak cells (low capacity, inconsistent voltage), desolder the old nickel strips, replace the faulty cells with matching high-quality ones, and resolder new nickel strips. Ensure proper cell alignment to avoid short circuits.
2. BMS Replacement
Tools needed: Multimeter, wire strippers, heat shrink tubing. Technique: Disconnect the old BMS from the cell pack, test the cell voltages to ensure they are balanced, connect the new BMS (matching voltage and current rating) to the cells and battery terminals, and insulate connections with heat shrink tubing.
3. Waterproofing Repair
Tools needed: Silicone sealant, replacement gaskets, waterproof connectors. Technique: Clean the battery case and lid, replace damaged gaskets, apply silicone sealant to the seam, and install new sealed connectors. Allow the sealant to cure for 24 hours before use.
4. Custom Repair Tools
Professional technicians often use custom tools, such as battery pack holders (to secure cells during soldering), precision soldering stations (for temperature control), and portable cell balancers (for on-site testing). These tools improve repair efficiency and ensure quality results.
Conclusion: Investing in Quality for Safety & Performance
Understanding the internal components of an e-bike battery—lithium-ion cells, nickel strips, BMS, and waterproofing—helps you make informed decisions when buying, maintaining, or repairing your battery. High-quality components may cost more upfront, but they offer longer life, better performance, and critical safety protections. By using advanced testing methods and the right repair tools, you can extend the lifespan of your e-bike battery and avoid costly replacements.
Whether you’re a casual rider or a professional technician, prioritizing quality and proper maintenance is key to getting the most out of your e-bike battery.


