How to Build an eBike Battery: A Complete DIY Guide
Building your own eBike battery isn’t just a cost-saving project—it lets you customize capacity, fit, and performance to match your riding needs. Whether you want an extended-range pack for long trails or a compact battery for your commuter eBike, a DIY lithium-ion eBike battery gives you full control. While it requires attention to detail and safety, the process is manageable with the right tools, parts, and guidance. In this step-by-step guide, we’ll walk you through everything you need to know to build a reliable, safe, and high-performance eBike battery.
Why Build a DIY eBike Battery?
Before diving into the build, let’s explore why many riders choose to assemble their own eBike batteries:
- Cost Savings: Pre-built eBike batteries can cost $300–$800, but a DIY version with premium cells costs 30–50% less.
- Customization: Tailor voltage (36V, 48V), capacity (10Ah–20Ah), and size to fit your eBike’s frame or rack.
- Quality Control: Choose top-tier lithium-ion cells (e.g., Samsung 21700, LG MJ1) and a reliable BMS instead of settling for generic pre-built packs.
- Repairability: DIY batteries are easier to repair or upgrade (e.g., replace a faulty cell) than sealed commercial packs.
Note: Building an eBike battery involves working with lithium-ion cells and electrical components—always prioritize safety (we’ll cover this in detail!).
Step 1: Plan Your eBike Battery Specs (Critical for Compatibility)
The first and most important step is to define your battery’s core specifications to ensure compatibility with your eBike’s motor and controller. Reference your eBike manual or old battery for these details:
Voltage (V): Match Your E-Bike’s Requirements
eBikes use 36V (most common for 250W–350W motors) or 48V (for 500W+ high-power motors). Using the wrong voltage will damage your motor or controller.
Key Tip: If you’re unsure, check your eBike’s charger (e.g., "36V 2A Charger") or controller label—this is non-negotiable for compatibility.
Capacity (Ah): Determine Your Range
Capacity (amp-hours, Ah) dictates how far you can ride: higher Ah = longer range. For example:
- 10Ah = 20–30 miles (36V 250W eBike)
- 15Ah = 30–45 miles
- 20Ah = 40–60 miles
Choose a capacity based on your riding habits—commuters may need 10–14Ah, while trail riders might opt for 15–20Ah. Remember: higher Ah means more cells and a larger pack, so ensure it fits your eBike’s battery compartment.
Cell Configuration: Series vs. Parallel
To achieve your desired voltage and capacity, you’ll wire cells in series (increases voltage) and parallel (increases capacity). Common configurations:
- 36V Battery: 10 cells in series (10S) × [X] cells in parallel (e.g., 10S4P = 40 cells, 14Ah)
- 48V Battery: 13 cells in series (13S) × [X] cells in parallel (e.g., 13S5P = 65 cells, 17.5Ah)
Example: A 48V 15Ah battery uses 13S4P (13 cells series × 4 cells parallel) with 18650 cells (3.7V each ×13 = 48.1V; 3.75Ah per cell ×4 = 15Ah).
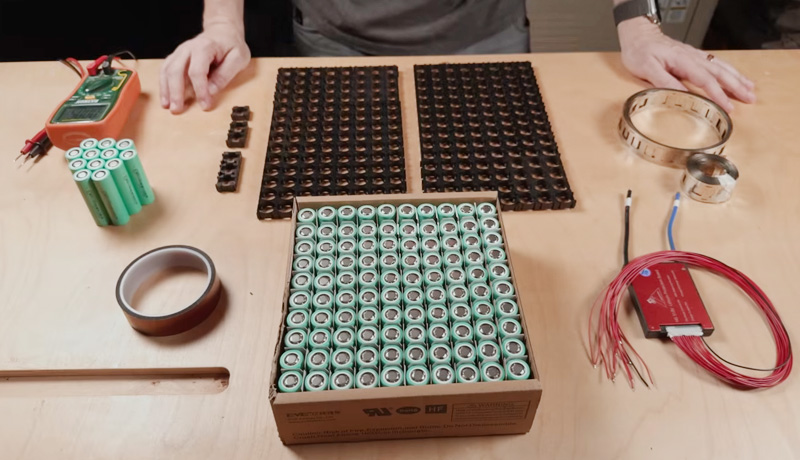
Step 2: Gather Tools & Materials for Your DIY eBike Battery
Invest in quality parts—skimping on cells or BMS will lead to poor performance or safety risks. Here’s your shopping list:
Core Materials
- Lithium-Ion Cells: Choose cylindrical (18650, 21700) or prismatic cells. 21700 cells offer higher energy density (better for range) than 18650. Opt for high-quality, brand-name cells (Samsung, LG, Panasonic) to avoid counterfeits. Keyword: high-quality lithium-ion eBike cells
- BMS (Battery Management System): A must-have for safety—select a BMS matching your voltage and current (e.g., 36V 30A, 48V 40A). Ensure it has cell balancing, overcharge/over-discharge protection. Keyword: eBike battery BMS system
- Nickel Strips: 0.1–0.2mm thick pure nickel strips (99.6% purity) for soldering cells—avoid nickel-plated steel (poor conductivity). Keyword: eBike battery nickel strips
- Battery Case: ABS plastic or aluminum case (IP54+ waterproof rating) with foam inserts to secure cells. Measure your cell pack first for a perfect fit.
- Connectors: Match your eBike’s discharge connector (XT60, XT90, Anderson Powerpole) and a charging port (DC jack).
- Insulation Materials: Heat shrink tubing, electrical tape, or silicone sealant to prevent short circuits.
Tools You’ll Need
- Soldering iron (60W–80W, temperature-controlled for precision)
- Solder (lead-free, 60/40 alloy works best for nickel)
- Cell tester (to check voltage and capacity of individual cells)
- Wire cutters/strippers
- Multimeter (to test voltage and continuity)
- Heat gun (for heat shrink tubing)
- Safety gear: gloves, goggles, fire extinguisher (lithium-ion safe)
Step 3: Prep & Sort Cells (Critical for Battery Life)
Lithium-ion cells must be matched for voltage and capacity to ensure balanced charging/discharging. Mismatched cells cause premature failure or safety hazards:
- Test Each Cell: Use a cell tester to measure voltage (should be 3.6–3.7V for new cells) and capacity. Discard cells with voltage below 3.5V or capacity 10%+ below the rated value.
- Sort by Voltage: Group cells with voltage differences ≤0.02V—this ensures uniform charging. For example, if one cell is 3.65V and another is 3.70V, they’ll charge/discharge unevenly.
- Arrange Cells: Lay out cells in your desired configuration (e.g., 10S4P) on a non-conductive surface (wood or plastic). Use cell holders or foam to keep them aligned—this makes soldering easier.
Keyword: eBike battery cell sorting
Step 4: Solder Nickel Strips (The Most Delicate Step)
Poor soldering is the #1 cause of DIY battery failures. Follow these steps for strong, safe connections:
- Prep the Soldering Iron: Heat to 350–380°C (660–716°F)—too hot will damage cells; too cold leads to cold joints.
- Solder in Parallel First: For a 10S4P pack, solder 4 cells together in parallel (connect positive to positive, negative to negative) using nickel strips. Hold the iron on the strip and cell terminal for 2–3 seconds, then apply solder—avoid direct heat on cells.
- Solder in Series: Connect the parallel groups in series (positive of one group to negative of the next) to reach your target voltage. Use shorter nickel strips for series connections to reduce resistance.
- Test Connections: Use a multimeter to check continuity and voltage of each parallel group—ensure no short circuits (multimeter beeps if shorted).
Safety Tip: Never leave the soldering iron on cells for more than 5 seconds—overheating can cause thermal runaway. Keyword: eBike battery soldering tutorial
Step 5: Install the BMS & Wire Connections
The BMS is the "brain" of your battery—install it correctly to protect against overcharging, over-discharging, and short circuits:
- Mount the BMS: Attach the BMS to the cell pack using double-sided tape (keep it away from cells to avoid heat buildup). Ensure the BMS’s voltage rating matches your pack (e.g., 36V BMS for 10S pack).
- Connect Balance Wires: Most BMS systems have balance wires (color-coded) that connect to each series cell group. For a 10S pack, connect the first balance wire to the negative terminal of the first group, then each subsequent wire to the positive terminal of each series group. This allows the BMS to balance cell voltages.
- Connect Discharge & Charging Wires: Solder the battery’s positive/negative discharge wires to the BMS’s discharge terminals, then connect the eBike connector (XT60, etc.) to these wires. Repeat for the charging port—ensure wires are insulated with heat shrink tubing.
- Test BMS Functionality: Use a multimeter to check the output voltage (should match your target voltage). Plug in the charger to verify the BMS accepts a charge without overheating.
Keyword: eBike BMS installation guide
Step 6: Insulate, Secure & Waterproof
Prevent short circuits and protect against the elements with proper insulation and waterproofing:
- Insulate Connections: Cover all soldered joints and BMS terminals with heat shrink tubing or electrical tape. Ensure no bare metal is exposed—this avoids short circuits if the battery shifts.
- Secure the Cell Pack: Place the cell pack and BMS into the battery case, then fill gaps with foam inserts or silicone—this prevents vibration damage during rides.
- Waterproofing: If you ride in rain, apply silicone sealant around the case lid and charging port. Use a case with an IP65+ rating for maximum protection against moisture and dust. Keyword: waterproof DIY eBike battery
Step 7: Test Your DIY eBike Battery (Final Checks)
Before installing the battery on your eBike, run these tests to ensure safety and performance:
- Voltage Test: Use a multimeter to confirm the battery’s output voltage matches your target (e.g., 48V for a 13S pack).
- Load Test: Connect the battery to your eBike and test all assist modes—check for overheating, voltage drops, or error codes on the display.
- Charge/Discharge Cycle: Charge the battery to 80% (avoid 100% for the first cycle), ride for 10–15 miles, then recharge. Monitor for consistent performance.
- Cell Balance Check: After 2–3 charge cycles, use a cell tester to check individual cell voltages—they should be within 0.02V of each other. If not, the BMS may need adjustment.
Safety Tips for Building & Using a DIY eBike Battery
Lithium-ion batteries are safe when handled correctly, but follow these rules to avoid risks:
- Always wear gloves and goggles when soldering—molten solder and lithium-ion cells can cause burns.
- Work in a well-ventilated area—avoid sparks or open flames near cells.
- Never puncture, crush, or short-circuit cells—this can cause fires or explosions.
- Store and charge the battery in a fire-resistant container (e.g., a metal box) for added safety.
- Dispose of old cells at a certified lithium-ion recycling center—never throw them in the trash.
Common DIY eBike Battery Mistakes to Avoid
- Using Counterfeit Cells: Cheap generic cells have inconsistent capacity and safety risks—stick to brand-name cells.
- Mismatched BMS: A BMS with a lower current rating than your eBike’s motor will overheat and fail (e.g., 20A BMS for a 500W eBike).
- Poor Soldering: Cold joints (weak connections) cause voltage drops or overheating—practice soldering on scrap nickel before working on cells.
- Ignoring Cell Balancing: Mismatched cells lead to premature battery death—always sort and test cells before assembly.
Conclusion: Enjoy Your Custom DIY eBike Battery
Building your own eBike battery is a rewarding project that saves money and lets you tailor performance to your needs. By following this guide—prioritizing compatibility, quality parts, and safety—you’ll end up with a reliable battery that outperforms many pre-built options. Whether you’re a casual commuter or a dedicated rider, a custom eBike battery ensures you get the range and fit you need for every adventure.
Remember: patience is key—take your time with soldering and testing, and don’t hesitate to seek help if you’re unsure. With the right tools and attention to detail, you’ll be riding on your DIY eBike battery in no time!


